---------------------------------------
To view current processes:
ps
ps aux | less
ps aux | grep "process-name"
ps aux | grep "httpd"
ps alx | grep "mysqld"
---------------------------------------
Network Info: netstat
netstat -lpn
netstat -lpn | grep mysql
---------------------------------------
Looking Around
Now that you know how to move from working directory to working directory, we're going to take a tour of your Linux system and, along the way, learn some things about what makes it tick. But before we begin, I have to teach you some tools that will come in handy during our adventure. These are:
- ls (list files and directories)
- less (view text files)
- file (classify a file's contents)
ls
The ls command is used to list the contents of a directory. It is probably the most commonly used Linux command. It can be used in a number of different ways. Here are some examples:
Examples of the ls command
| Command |
Result |
| ls |
List the files in the working directory
|
| ls /bin |
List the files in the /bin directory (or any other directory you care to specify)
|
| ls -l |
List the files in the working directory in long format
|
| ls -l /etc /bin |
List the files in the /bin directory and the /etc directory in long format
|
| ls -la .. |
List all files (even ones with names beginning with a period character, which are normally hidden) in the parent of the working directory in long format
|
These examples also point out an important concept about commands. Most commands operate like this:
command -options arguments
where command is the name of the command, -options is one or more adjustments to the command's behavior, and arguments is one or more "things" upon which the command operates.
In the case of ls, we see that ls is the name of the command, and that it can have one or more options, such as -a and -l, and it can operate on one or more files or directories.
A Closer Look At Long Format
If you use the -l option with ls, you will get a file listing that contains a wealth of information about the files being listed. Here's an example:
-rw-------    1 bshotts    bshotts    576       Apr 17 1998    weather.txt
drwxr-xr-x    6 bshotts    bshotts    1024       Oct 9 1999    web_page
-rw-rw-r--    1 bshotts    bshotts    276480    Feb 11 20:41    web_site.tar
-rw-------    1 bshotts    bshotts    5743       Dec 16 1998    xmas_file.txt
----------    -------     -------    --------    ------------    -------------
   |             |          |          |             |                |
   |             |          |          |             |                File Name
   |             |          |          |             |
   |             |          |          |             +--- Modification Time
   |             |          |          |
   |             |          |          +------------- Size (in bytes)
   |             |          |
   |             |          +----------------------- Group
   |             |
   |             +-------------------------------- Owner
   |
   +---------------------------------------------- File Permissions
- File Name
- The name of the file or directory.
- Modification Time
- The last time the file was modified. If the last modification occurred more than six months in the past, the date and year are displayed. Otherwise, the time of day is shown.
- Size
- The size of the file in bytes.
- Group
- The name of the group that has file permissions in addition to the file's owner.
- Owner
- The name of the user who owns the file.
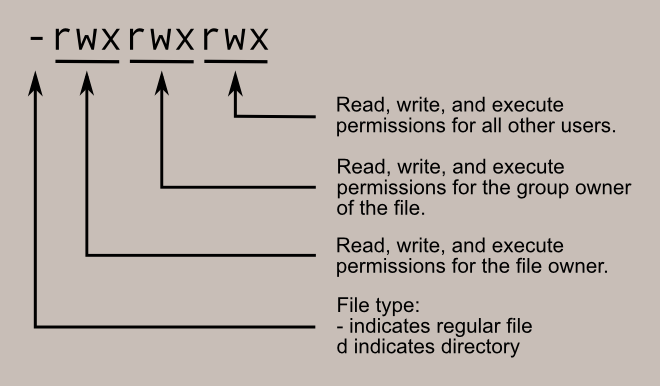
- File Permissions
- A representation of the file's access permissions. The first character is the type of file. A "-" indicates a regular (ordinary) file. A "d" indicates a directory. The second set of three characters represent the read, write, and execution rights of the file's owner. The next three represent the rights of the file's group, and the final three represent the rights granted to everybody else. I'll discuss this in more detail in a later lesson.
less
less is a program that lets you view text files. This is very handy since many of the files used to control and configure Linux are human readable.
What is "text"?
There are many ways to represent information on a computer. All methods involve defining a relationship between the information and some numbers that will be used to represent it. Computers, after all, only understand numbers and all data is converted to numeric representation.
Some of these representation systems are very complex (such as compressed multimedia files), while others are rather simple. One of the earliest and simplest is called ASCII text. ASCII (pronounced "As-Key") is short for American Standard Code for Information Interchange. This is a simple encoding scheme that was first used on Teletype machines to map keyboard characters to numbers.
Text is a simple one-to-one mapping of characters to numbers. It is very compact. Fifty characters of text translates to fifty bytes of data. Throughout a Linux system, many files are stored in text format and there are many Linux tools that work with text files. Even the legacy operating systems recognize the importance of this format. The well-known NOTEPAD.EXE program is an editor for plain ASCII text files.
The less program is invoked by simply typing:
less text_file
This will display the file.
Controlling less
Once started, less will display the text file one page at a time. You may use the Page Up and Page Down keys to move through the text file. To exit less, type "q". Here are some commands that less will accept:
Keyboard commands for the less program
| Command |
Action |
|
Page Up or b
|
Scroll back one page
|
|
Page Down or space
|
Scroll forward one page
|
|
G
|
Go to the end of the text file
|
|
g
|
Go to the beginning of the text file
|
|
/characters
|
Search forward in the text file for an occurrence of the specified characters
|
| ?characters |
Backward search |
| n |
Repeat the previous search
|
|
h
|
Display a complete list less commands and options
|
|
q
|
Quit
|
| j |
forward by one line |
| k |
backward by one line |
file
As you wander around your Linux system, it is helpful to determine what kind of data a file contains before you try to view it. This is where the file command comes in. file will examine a file and tell you what kind of file it is.
To use the file program, just type:
file name_of_file
The file program can recognize most types of files, such as:
Various kinds of files
| File Type |
Description |
Viewable as text? |
|
ASCII text
|
The name says it all
|
yes
|
|
Bourne-Again shell script text
|
A bash script
|
yes
|
|
ELF 32-bit LSB core file
|
A core dump file (a program will create this when it crashes)
|
no
|
|
ELF 32-bit LSB executable
|
An executable binary program
|
no
|
|
ELF 32-bit LSB shared object
|
A shared library
|
no
|
|
GNU tar archive
|
A tape archive file. A common way of storing groups of files.
|
no, use tar tvf to view listing.
|
|
gzip compressed data
|
An archive compressed with gzip
|
no
|
|
HTML document text
|
A web page
|
yes
|
|
JPEG image data
|
A compressed JPEG image
|
no
|
|
PostScript document text
|
A PostScript file
|
yes
|
|
RPM
|
A Red Hat Package Manager archive
|
no, use rpm -q to examine contents.
|
|
Zip archive data
|
An archive compressed with zip
|
no
|
While it may seem that most files cannot be viewed as text, you will be surprised how many can. This is especially true of the important configuration files. You will also notice during our adventure that many features of the operating system are controlled by shell scripts. In Linux, there are no secrets!
A Guided Tour
It's time to take our tour. The table below lists some interesting places to explore. This is by no means a complete list, but it should prove to be an interesting adventure. For each of the directories listed below, do the following:
- cd into each directory.
- Use ls to list the contents of the directory.
- If you see an interesting file, use the file command to determine its contents.
- For text files, use less to view them.
Interesting directories and their contents
| Directory |
Description |
| / |
The root directory where the file system begins. In most cases the root directory only contains subdirectories. |
| /boot |
This is where the Linux kernel and boot loader files are kept. The kernel is a file called vmlinuz. |
| /etc |
The /etc directory contains the configuration files for the system. All of the files in /etc should be text files. Points of interest:
- /etc/passwd
- The passwd file contains the essential information for each user. It is here that users are defined.
- /etc/fstab
- The fstab file contains a table of devices that get mounted when your system boots. This file defines your disk drives.
- /etc/hosts
- This file lists the network host names and IP addresses that are intrinsically known to the system.
- /etc/init.d
- This directory contains the scripts that start various system services typically at boot time.
|
| /bin, /usr/bin |
These two directories contain most of the programs for the system. The /bin directory has the essential programs that the system requires to operate, while /usr/bin contains applications for the system's users. |
| /sbin, /usr/sbin |
The sbin directories contain programs for system administration, mostly for use by the superuser. |
| /usr |
The /usr directory contains a variety of things that support user applications. Some highlights:
- /usr/share/X11
- Support files for the X Window system
- /usr/share/dict
- Dictionaries for the spelling checker. Bet you didn't know that Linux had a spelling checker. See look and aspell.
- /usr/share/doc
- Various documentation files in a variety of formats.
- /usr/share/man
- The man pages are kept here.
- /usr/src
- Source code files. If you installed the kernel source code package, you will find the entire Linux kernel source code here.
|
| /usr/local |
/usr/local and its subdirectories are used for the installation of software and other files for use on the local machine. What this really means is that software that is not part of the official distribution (which usually goes in /usr/bin) goes here.
When you find interesting programs to install on your system, they should be installed in one of the /usr/local directories. Most often, the directory of choice is /usr/local/bin. |
| /var |
The /var directory contains files that change as the system is running. This includes:
- /var/log
- Directory that contains log files. These are updated as the system runs. You should view the files in this directory from time to time, to monitor the health of your system.
- /var/spool
- This directory is used to hold files that are queued for some process, such as mail messages and print jobs. When a user's mail first arrives on the local system (assuming you have local mail), the messages are first stored in /var/spool/mail
|
| /lib |
The shared libraries (similar to DLLs in that other operating system) are kept here. |
| /home |
/home is where users keep their personal work. In general, this is the only place users are allowed to write files. This keeps things nice and clean :-) |
| /root |
This is the superuser's home directory. |
| /tmp |
/tmp is a directory in which programs can write their temporary files. |
| /dev |
The /dev directory is a special directory, since it does not really contain files in the usual sense. Rather, it contains devices that are available to the system. In Linux (like Unix), devices are treated like files. You can read and write devices as though they were files. For example /dev/fd0 is the first floppy disk drive, /dev/sda (/dev/hda on older systems) is the first hard drive. All the devices that the kernel understands are represented here. |
| /proc |
The /proc directory is also special. This directory does not contain files. In fact, this directory does not really exist at all. It is entirely virtual. The /proc directory contains little peep holes into the kernel itself. There are a group of numbered entries in this directory that correspond to all the processes running on the system. In addition, there are a number of named entries that permit access to the current configuration of the system. Many of these entries can be viewed. Try viewing /proc/cpuinfo. This entry will tell you what the kernel thinks of your CPU. |
| /media,/mnt |
Finally, we come to /media, a normal directory which is used in a special way. The /media directory is used for mount points. As we learned in the second lesson, the different physical storage devices (like hard disk drives) are attached to the file system tree in various places. This process of attaching a device to the tree is called mounting. For a device to be available, it must first be mounted.
When your system boots, it reads a list of mounting instructions in the file /etc/fstab, which describes which device is mounted at which mount point in the directory tree. This takes care of the hard drives, but you may also have devices that are considered temporary, such as CD-ROMs, thumb drives, and floppy disks. Since these are removable, they do not stay mounted all the time. The /media directory is used by the automatic device mounting mechanisms found in modern desktop oriented Linux distributions. On systems that require manual mounting of removable devices, the /mnt directory provides a convenient place for mounting these temporary devices. You will often see the directories /mnt/floppy and /mnt/cdrom. To see what devices and mount points are used, type mount. |
A weird kind of file...
During your tour, you probably noticed a strange kind of directory entry, particularly in the /boot and /lib directories. When listed with ls -l, you would have seen something like this:
lrwxrwxrwx 25 Jul 3 16:42 System.map -> /boot/System.map-2.0.36-3
-rw-r--r-- 105911 Oct 13 1998 System.map-2.0.36-0.7
-rw-r--r-- 105935 Dec 29 1998 System.map-2.0.36-3
-rw-r--r-- 181986 Dec 11 1999 initrd-2.0.36-0.7.img
-rw-r--r-- 182001 Dec 11 1999 initrd-2.0.36.img
lrwxrwxrwx 26 Jul 3 16:42 module-info -> /boot/module-info-2.0.36-3
-rw-r--r-- 11773 Oct 13 1998 module-info-2.0.36-0.7
-rw-r--r-- 11773 Dec 29 1998 module-info-2.0.36-3
lrwxrwxrwx 16 Dec 11 1999 vmlinuz -> vmlinuz-2.0.36-3
-rw-r--r-- 454325 Oct 13 1998 vmlinuz-2.0.36-0.7
-rw-r--r-- 454434 Dec 29 1998 vmlinuz-2.0.36-3
Notice the files, System.map, module-info and vmlinuz. See the strange notation after the file names?
These three files are called symbolic links. Symbolic links are a special type of file that points to another file. With symbolic links, it is possible for a single file to have multiple names. Here's how it works: Whenever the system is given a file name that is a symbolic link, it transparently maps it to the file it is pointing to.
Just what is this good for? This is a very handy feature. Let's consider the directory listing above (which is the /boot directory of an old Red Hat 5.2 system). This system has had multiple versions of the Linux kernel installed. We can see this from the files vmlinuz-2.0.36-0.7 and vmlinuz-2.0.36-3. These file names suggest that both version 2.0.36-0.7 and 2.0.36-3 are installed. Because the file names contain the version it is easy to see the differences in the directory listing. However, this would be confusing to programs that rely on a fixed name for the kernel file. These programs might expect the kernel to simply be called "vmlinuz". Here is where the beauty of the symbolic link comes in. By creating a symbolic link called vmlinuz that points to vmlinuz-2.0.36-3, we have solved the problem.
To create symbolic links, use the ln command.
Manipulating Files
This lesson will introduce you to the following commands:
- cp - copy files and directories
- mv - move or rename files and directories
- rm - remove files and directories
- mkdir - create directories
These four commands are among the most frequently used Linux commands. They are the basic commands for manipulating both files and directories.
Now, to be frank, some of the tasks performed by these commands are more easily done with a graphical file manager. With a file manager, you can drag and drop a file from one directory to another, cut and paste files, delete files, etc. So why use these old command line programs?
The answer is power and flexibility. While it is easy to perform simple file manipulations with a graphical file manager, complicated tasks can be easier with the command line programs. For example, how would you copy all the HTML files from one directory to another, but only copy files that did not exist in the destination directory or were newer than the versions in the destination directory? Pretty hard with with a file manager. Pretty easy with the command line:
[me@linuxbox me]$ cp -u *.html destination
Wildcards
Before I begin with our commands, I want to talk about a shell feature that makes these commands so powerful. Since the shell uses filenames so much, it provides special characters to help you rapidly specify groups of filenames. These special characters are called wildcards. Wildcards allow you to select filenames based on patterns of characters. The table below lists the wildcards and what they select:
Summary of wildcards and their meanings
| Wildcard |
Meaning |
|
*
|
Matches any characters
|
|
?
|
Matches any single character
|
|
[characters]
|
Matches any character that is a member of the set characters. The set of characters may also be expressed as a POSIX character class such as one of the following:
POSIX Character Classes
| [:alnum:] |
Alphanumeric characters |
| [:alpha:] |
Alphabetic characters |
| [:digit:] |
Numerals |
| [:upper:] |
Uppercase alphabetic characters |
| [:lower:] |
Lowercase alphabetic characters |
|
|
[!characters]
|
Matches any character that is not a member of the set characters
|
Using wildcards, it is possible to construct very sophisticated selection criteria for filenames. Here are some examples of patterns and what they match:
Examples of wildcard matching
| Pattern |
Matches |
*
|
All filenames
|
g*
|
All filenames that begin with the character "g"
|
b*.txt
|
All filenames that begin with the character "b" and end with the characters ".txt"
|
Data???
|
Any filename that begins with the characters "Data" followed by exactly 3 more characters
|
[abc]*
|
Any filename that begins with "a" or "b" or "c" followed by any other characters
|
[[:upper:]]*
|
Any filename that begins with an uppercase letter. This is an example of a character class.
|
BACKUP.[[:digit:]][[:digit:]]
|
Another example of character classes. This pattern matches any filename that begins with the characters "BACKUP." followed by exactly two numerals.
|
*[![:lower:]]
|
Any filename that does not end with a lowercase letter.
|
You can use wildcards with any command that accepts filename arguments.
cp
The cp program copies files and directories. In its simplest form, it copies a single file:
[me@linuxbox me]$ cp file1 file2
It can also be used to copy multiple files (and/or directories) to a different directory:
[me@linuxbox me]$ cp file... directory
A note on notation: ... signifies that an item can be repeated one or more times.
Other useful examples of cp and its options include:
Examples of the cp command
| Command |
Results |
cp file1 file2
|
Copies the contents of file1 into file2. If file2 does not exist, it is created; otherwise, file2 is silently overwritten with the contents of file1.
|
cp -i file1 file2
|
Like above however, since the "-i" (interactive) option is specified, if file2 exists, the user is prompted before it is overwritten with the contents of file1.
|
cp file1 dir1
|
Copy the contents of file1 (into a file named file1) inside of directory dir1.
|
cp -R dir1 dir2
|
Copy the contents of the directory dir1. If directory dir2 does not exist, it is created. Otherwise, it creates a directory named dir1 within directory dir2.
|
mv
The mv command moves or renames files and directories depending on how it is used. It will either move one or more files to a different directory, or it will rename a file or directory. To rename a file, it is used like this:
[me@linuxbox me]$ mv filename1 filename2
To move files (and/or directories) to a different directory:
[me@linuxbox me]$ mv file... directory
Examples of mv and its options include:
Examples of the mv command
| Command |
Results |
mv file1 file2
|
If file2 does not exist, then file1 is renamed file2. If file2 exists, its contents are silently replaced with the contents of file1.
|
mv -i file1 file2
|
Like above however, since the "-i" (interactive) option is specified, if file2 exists, the user is prompted before it is overwritten with the contents of file1.
|
mv file1 file2 file3 dir1
|
The files file1, file2, file3 are moved to directory dir1. If dir1 does not exist, mv will exit with an error.
|
mv dir1 dir2
|
If dir2 does not exist, then dir1 is renamed dir2. If dir2 exists, the directory dir1 is moved within directory dir2.
|
rm
The rm command removes (deletes) files and directories.
[me@linuxbox me]$ rm file...
It can also be used to delete directories:
[me@linuxbox me]$ rm -r directory...
Examples of rm and its options include:
Examples of the rm command
| Command |
Results |
rm file1 file2
|
Delete file1 and file2.
|
rm -i file1 file2
|
Like above however, since the "-i" (interactive) option is specified, the user is prompted before each file is deleted.
|
rm -r dir1 dir2
rm -rf dir1 dir2
(force)
|
Directories dir1 and dir2 are deleted along with all of their contents.
|
Be careful with rm!
Linux does not have an undelete command. Once you delete something with rm, it's gone. You can inflict terrific damage on your system with rm if you are not careful, particularly with wildcards.
Before you use rm with wildcards, try this helpful trick: construct your command using ls instead. By doing this, you can see the effect of your wildcards before you delete files. After you have tested your command with ls, recall the command with the up-arrow key and then substitute rm for ls in the command.
mkdir
The mkdir command is used to create directories. To use it, you simply type:
[me@linuxbox me]$ mkdir directory...
Using Commands With Wildcards
Since the commands we have covered here accept multiple file and directories names as arguments, you can use wildcards to specify them. Here are a few examples:
Command examples using wildcards
| Command |
Results |
cp *.txt text_files
|
Copy all files in the current working directory with names ending with the characters ".txt" to an existing directory named text_files.
|
mv my_dir ../*.bak my_new_dir
|
Move the subdirectory my_dir and all the files ending in ".bak" in the current working directory's parent directory to an existing directory named my_new_dir.
|
rm *~
|
Delete all files in the current working directory that end with the character "~". Some applications create backup files using this naming scheme. Using this command will clean them out of a directory.
|
Working With Commands
Up until now you have seen a number of commands and their mysterious options and arguments. In this lesson, we will try to remove some of that mystery. This lesson will introduce the following commands.
- type - Display information about command type
- which - Locate a command
- help - Display reference page for shell builtin
- man - Display an on-line command reference
What Are "Commands?"
Commands can be one of 4 different kinds:
- An executable program like all those files we saw in /usr/bin. Within this category, programs can be compiled binaries such as programs written in C and C++, or programs written in scripting languages such as the shell, Perl, Python, Ruby, etc.
- A command built into the shell itself. bash provides a number of commands internally called shell builtins. The cd command, for example, is a shell builtin.
- A shell function. These are miniature shell scripts incorporated into the environment. We will cover configuring the environment and writing shell functions in later lessons, but for now, just be aware that they exist.
- An alias. Commands that you can define yourselves, built from other commands. This will be covered in a later lesson.
Identifying Commands
It is often useful to know exactly which of the four kinds of commands is being used and Linux provides a couple of ways to find out.
type
The type command is a shell builtin that displays the kind of command the shell will execute, given a particular command name. It works like this:
type command
where “command” is the name of the command you want to examine. Here are some examples:
[me@linuxbox me]$ type type
type is a shell builtin
[me@linuxbox me]$ type ls
ls is aliased to `ls --color=tty'
[me@linuxbox me]$ type cp
cp is /bin/cp
Here we see the results for three different commands. Notice that the one for ls (taken from a Fedora system) and how the ls command is actually an alias for the ls command with the “-- color=tty” option added. Now we know why the output from ls is displayed in color!
which
Sometimes there is more than one version of an executable program installed on a system. While this is not very common on desktop systems, it's not unusual on large servers. To determine the exact location of a given executable, the which command is used:
[me@linuxbox me]$ which ls
/bin/ls
which only works for executable programs, not builtins nor aliases that are substitutes for actual executable programs.
Getting Command Documentation
With this knowledge of what a command is, we can now search for the documentation available for each kind of command.
help
bash has a built-in help facility available for each of the shell builtins. To use it, type “help” followed by the name of the shell builtin. Optionally, you may add the -m option to change the format of the output. For example:
[me@linuxbox me]$ help -m cd
NAME
cd - Change the shell working directory.
SYNOPSIS
cd [-L|-P] [dir]
DESCRIPTION
Change the shell working directory.
Change the current directory to DIR. The default DIR is the value of the
HOME shell variable.
The variable CDPATH defines the search path for the directory containing
DIR. Alternative directory names in CDPATH are separated by a colon (:).
A null directory name is the same as the current directory. If DIR begins
with a slash (/), then CDPATH is not used.
If the directory is not found, and the shell option `cdable_vars' is set,
the word is assumed to be a variable name. If that variable has a value,
its value is used for DIR.
Options:
-L	force symbolic links to be followed
-P	use the physical directory structure without following symbolic
links
The default is to follow symbolic links, as if `-L' were specified.
Exit Status:
Returns 0 if the directory is changed; non-zero otherwise.
SEE ALSO
bash(1)
IMPLEMENTATION
GNU bash, version 4.1.5(1)-release (i486-pc-linux-gnu)
Copyright (C) 2009 Free Software Foundation, Inc.
A note on notation: When square brackets appear in the description of a command's syntax, they indicate optional items. A vertical bar character indicates mutually exclusive items. In the case of the cd command above:
cd [-L|-P] [dir]
This notation says that the command cd may be followed optionally by either a “-L” or a “-P” and further, optionally followed by the argument “dir”.
--help
Many executable programs support a “--help” option that displays a description of the command's supported syntax and options. For example:
[me@linuxbox me]$ mkdir --help
Usage: mkdir [OPTION] DIRECTORY...
Create the DIRECTORY(ies), if they do not already exist.
-Z, --context=CONTEXT (SELinux) set security context to CONTEXT
Mandatory arguments to long options are mandatory for short options
too.
-m, --mode=MODE set file mode (as in chmod), not a=rwx – umask
-p, --parents no error if existing, make parent directories as
needed
-v, --verbose print a message for each created directory
--help display this help and exit
--version output version information and exit
Some programs don't support the “--help” option, but try it anyway. Often it results in an error message that will reveal similar usage information.
man
Most executable programs intended for command line use provide a formal piece of documentation called a manual or man page. A special paging program called man is used to view them. It is used like this:
man program
where “program” is the name of the command to view. Man pages vary somewhat in format but generally contain a title, a synopsis of the command's syntax, a description of the command's purpose, and a listing and description of each of the command's options. Man pages, however, do not usually include examples, and are intended as a reference, not a tutorial. As an example, let's try viewing the man pagefor the ls command:
On most Linux systems, man uses less to display the manual page, so all of the familiar less commands work while displaying the page.
README And Other Documentation Files
Many software packages installed on your system have documentation files residing in the /usr/share/doc directory. Most of these are stored in plain text format and can be viewed with less. Some of the files are in HTML format and can be viewed with your web browser. You may encounter some files ending with a “.gz” extension. This indicates that they have been compressed with the gzip compression program. The gzip package includes a special version of less called zless that will display the contents of gzip-compressed text files.
I/O Redirection
In this lesson, we will explore a powerful feature used by many command line programs called input/output redirection. As we have seen, many commands such as ls print their output on the display. This does not have to be the case, however. By using some special notations we can redirect the output of many commands to files, devices, and even to the input of other commands.
Standard Output
Most command line programs that display their results do so by sending their results to a facility called standard output. By default, standard output directs its contents to the display. To redirect standard output to a file, the ">" character is used like this:
[me@linuxbox me]$ ls > file_list.txt
In this example, the ls command is executed and the results are written in a file named file_list.txt. Since the output of ls was redirected to the file, no results appear on the display.
Each time the command above is repeated, file_list.txt is overwritten from the beginning with the output of the command ls. If you want the new results to be appended to the file instead, use ">>" like this:
[me@linuxbox me]$ ls >> file_list.txt
When the results are appended, the new results are added to the end of the file, thus making the file longer each time the command is repeated. If the file does not exist when you attempt to append the redirected output, the file will be created.
Standard Input
Many commands can accept input from a facility called standard input. By default, standard input gets its contents from the keyboard, but like standard output, it can be redirected. To redirect standard input from a file instead of the keyboard, the "<" character is used like this:
[me@linuxbox me]$ sort < file_list.txt
In the example above, we used the sort command to process the contents of file_list.txt. The results are output on the display since the standard output was not redirected. We could redirect standard output to another file like this:
[me@linuxbox me]$ sort < file_list.txt > sorted_file_list.txt
As you can see, a command can have both its input and output redirected. Be aware that the order of the redirection does not matter. The only requirement is that the redirection operators (the "<" and ">") must appear after the other options and arguments in the command.
Pipelines
The most useful and powerful thing you can do with I/O redirection is to connect multiple commands together with what are called pipelines. With pipelines, the standard output of one command is fed into the standard input of another. Here is my absolute favorite:
[me@linuxbox me]$ ls -l | less
In this example, the output of the ls command is fed into less. By using this "| less" trick, you can make any command have scrolling output. I use this technique all the time.
By connecting commands together, you can acomplish amazing feats. Here are some examples you'll want to try:
Examples of commands used together with pipelines
| Command |
What it does |
|
ls -lt | head
|
Displays the 10 newest files in the current directory.
|
|
du | sort -nr
|
Displays a list of directories and how much space they consume, sorted from the largest to the smallest.
|
|
find . -type f -print | wc -l
|
Displays the total number of files in the current working directory and all of its subdirectories.
|
Filters
One kind of program frequently used in pipelines is called filters. Filters take standard input and perform an operation upon it and send the results to standard output. In this way, they can be combined to process information in powerful ways. Here are some of the common programs that can act as filters:
Common filter commands
| Program |
What it does |
|
sort
|
Sorts standard input then outputs the sorted result on standard output.
|
|
uniq
|
Given a sorted stream of data from standard input, it removes duplicate lines of data (i.e., it makes sure that every line is unique).
|
|
grep
|
Examines each line of data it receives from standard input and outputs every line that contains a specified pattern of characters.
|
|
fmt
|
Reads text from standard input, then outputs formatted text on standard output.
|
|
pr
|
Takes text input from standard input and splits the data into pages with page breaks, headers and footers in preparation for printing.
|
|
head
|
Outputs the first few lines of its input. Useful for getting the header of a file.
|
|
tail
|
Outputs the last few lines of its input. Useful for things like getting the most recent entries from a log file.
|
|
tr
|
Translates characters. Can be used to perform tasks such as upper/lowercase conversions or changing line termination characters from one type to another (for example, converting DOS text files into Unix style text files).
|
|
sed
|
Stream editor. Can perform more sophisticated text translations than tr.
|
|
awk
|
An entire programming language designed for constructing filters. Extremely powerful.
|
Performing tasks with pipelines
- Printing from the command line. Linux provides a program called lpr that accepts standard input and sends it to the printer. It is often used with pipes and filters. Here are a couple of examples:
     cat poorly_formatted_report.txt | fmt | pr | lpr
     cat unsorted_list_with_dupes.txt | sort | uniq | pr | lpr
In the first example, we use cat to read the file and output it to standard output, which is piped into the standard input of fmt. fmt formats the text into neat paragraphs and outputs it to standard output, which is piped into the standard input of pr. pr splits the text neatly into pages and outputs it to standard output, which is piped into the standard input of lpr. lpr takes its standard input and sends it to the printer.
The second example starts with an unsorted list of data with duplicate entries. First, cat sends the list into sort which sorts it and feeds it into uniq which removes any duplicates. Next pr and lpr are used to paginate and print the list.
- Viewing the contents of tar files Often you will see software distributed as a gzipped tar file. This is a traditional Unix style tape archive file (created with tar) that has been compressed with gzip. You can recognize these files by their traditional file extensions, ".tar.gz" or ".tgz". You can use the following command to view the directory of such a file on a Linux system:
tar tzvf name_of_file.tar.gz | less
Expansion
Each time you type a command line and press the enter key, bash performs several processes upon the text before it carries out your command. We have seen a couple of cases of how a simple character sequence, for example “*”, can have a lot of meaning to the shell. The process that makes this happen is called expansion. With expansion, you type something and it is expanded into something else before the shell acts upon it. To demonstrate what we mean by this, let's take a look at the echo command. echo is a shell builtin that performs a very simple task. It prints out its text arguments on standard output:
[me@linuxbox me]$ echo this is a test
this is a test
That's pretty straightforward. Any argument passed to echo gets displayed. Let's try another example:
[me@linuxbox me]$ echo *
Desktop Documents ls-output.txt Music Pictures Public Templates Videos
So what just happened? Why didn't echo print “*”? As you recall from our work with wildcards, the “*” character means match any characters in a filename, but what we didn't see in our original discussion was how the shell does that. The simple answer is that the shell expands the “*” into something else (in this instance, the names of the files in the current working directory) before the echo command is executed. When the enter key is pressed, the shell automatically expands any qualifying characters on the command line before the command is carried out, so the echo command never saw the “*”, only its expanded result. Knowing this, we can see that echo behaved as expected.
Pathname Expansion
The mechanism by which wildcards work is called pathname expansion. If we try some of the techniques that we employed in our earlier lessons, we will see that they are really expansions. Given a home directory that looks like this:
[me@linuxbox me]$ ls
Desktop
ls-output.txt
Documents Music
Pictures
Public
Templates
Videos
we could carry out the following expansions:
[me@linuxbox me]$ echo D*
Desktop Documents
and:
[me@linuxbox me]$ echo *s
Documents Pictures Templates Videos
or even:
[me@linuxbox me]$ echo [[:upper:]]*
Desktop Documents Music Pictures Public Templates Videos
and looking beyond our home directory:
[me@linuxbox me]$ echo /usr/*/share
/usr/kerberos/share /usr/local/share
Tilde Expansion
As you may recall from our introduction to the cd command, the tilde character (“~”) has a special meaning. When used at the beginning of a word, it expands into the name of the home directory of the named user, or if no user is named, the home directory of the current user:
[me@linuxbox me]$ echo ~
/home/me
If user “foo” has an account, then:
[me@linuxbox me]$ echo ~foo
/home/foo
Arithmetic Expansion
The shell allows arithmetic to be performed by expansion. This allow us to use the shell prompt as a calculator:
[me@linuxbox me]$ echo $((2 + 2))
4
Arithmetic expansion uses the form:
$((expression))
where expression is an arithmetic expression consisting of values and arithmetic operators.
Arithmetic expansion only supports integers (whole numbers, no decimals), but can perform quite a number of different operations.
Spaces are not significant in arithmetic expressions and expressions may be nested. For example, to multiply five squared by three:
[me@linuxbox me]$ echo $(($((5**2)) * 3))
75
Single parentheses may be used to group multiple subexpressions. With this technique, we can rewrite the example above and get the same result using a single expansion instead of two:
[me@linuxbox me]$ echo $(((5**2) * 3))
75
Here is an example using the division and remainder operators. Notice the effect of integer division:
[me@linuxbox me]$ echo Five divided by two equals $((5/2))
Five divided by two equals 2
[me@linuxbox me]$ echo with $((5%2)) left over.
with 1 left over.
Brace Expansion
Perhaps the strangest expansion is called brace expansion. With it, you can create multiple text strings from a pattern containing braces. Here's an example:
[me@linuxbox me]$ echo Front-{A,B,C}-Back
Front-A-Back Front-B-Back Front-C-Back
Patterns to be brace expanded may contain a leading portion called a preamble and a trailing portion called a postscript. The brace expression itself may contain either a comma-separated list of strings, or a range of integers or single characters. The pattern may not contain embedded whitespace. Here is an example using a range of integers:
[me@linuxbox me]$ echo Number_{1..5}
Number_1 Number_2 Number_3 Number_4 Number_5
A range of letters in reverse order:
[me@linuxbox me]$ echo {Z..A}
Z Y X W V U T S R Q P O N M L K J I H G F E D C B A
Brace expansions may be nested:
[me@linuxbox me]$ echo a{A{1,2},B{3,4}}b
aA1b aA2b aB3b aB4b
So what is this good for? The most common application is to make lists of files or directories to be created. For example, if you were a photographer and had a large collection of images you wanted to organize into years and months, the first thing you might do is create a series of directories named in numeric “Year-Month” format. This way, the directory names will sort in chronological order. You could type out a complete list of directories, but that's a lot of work and it's error-prone too. Instead, you could do this:
[me@linuxbox me]$ mkdir Photos
[me@linuxbox me]$ cd Photos
[me@linuxbox Photos]$ mkdir {2007..2009}-0{1..9} {2007..2009}-{10..12}
[me@linuxbox Photos]$ ls
2007-01 2007-07 2008-01 2008-07 2009-01 2009-07
2007-02 2007-08 2008-02 2008-08 2009-02 2009-08
2007-03 2007-09 2008-03 2008-09 2009-03 2009-09
2007-04 2007-10 2008-04 2008-10 2009-04 2009-10
2007-05 2007-11 2008-05 2008-11 2009-05 2009-11
2007-06 2007-12 2008-06 2008-12 2009-06 2009-12
Pretty slick!
Parameter Expansion
We're only going to touch briefly on parameter expansion in this lesson, but we'll be covering it more later. It's a feature that is more useful in shell scripts than directly on the command line. Many of its capabilities have to do with the system's ability to store small chunks of data and to give each chunk a name. Many such chunks, more properly called variables, are available for your examination. For example, the variable named “USER” contains your user name. To invoke parameter expansion and reveal the contents of USER you would do this:
[me@linuxbox me]$ echo $USER
me
To see a list of available variables, try this:
[me@linuxbox me]$ printenv | less
You may have noticed that with other types of expansion, if you mistype a pattern, the expansion will not take place and the echo command will simply display the mistyped pattern. With parameter expansion, if you misspell the name of a variable, the expansion will still take place, but will result in an empty string:
[me@linuxbox me]$ echo $SUER
[me@linuxbox ~]$
Command Substitution
Command substitution allows us to use the output of a command as an expansion:
[me@linuxbox me]$ echo $(ls)
Desktop Documents ls-output.txt Music Pictures Public Templates Videos
One of my favorites goes something like this:
[me@linuxbox me]$ ls -l $(which cp)
-rwxr-xr-x 1 root root 71516 2007-12-05 08:58 /bin/cp
Here we passed the results of which cp as an argument to the ls command, thereby getting the listing of of the cp program without having to know its full pathname. We are not limited to just simple commands. Entire pipelines can be used (only partial output shown):
[me@linuxbox me]$ file $(ls /usr/bin/* | grep bin/zip)
/usr/bin/bunzip2:
/usr/bin/zip: ELF 32-bit LSB executable, Intel 80386, version 1
(SYSV), dynamically linked (uses shared libs), for GNU/Linux 2.6.15, stripped
/usr/bin/zipcloak: ELF 32-bit LSB executable, Intel 80386, version 1
(SYSV), dynamically linked (uses shared libs), for GNU/Linux 2.6.15, stripped
/usr/bin/zipgrep: POSIX shell script text executable
/usr/bin/zipinfo: ELF 32-bit LSB executable, Intel 80386, version 1
(SYSV), dynamically linked (uses shared libs), for GNU/Linux 2.6.15, stripped
/usr/bin/zipnote: ELF 32-bit LSB executable, Intel 80386, version 1
(SYSV), dynamically linked (uses shared libs), for GNU/Linux 2.6.15, stripped
/usr/bin/zipsplit: ELF 32-bit LSB executable, Intel 80386, version 1
(SYSV), dynamically linked (uses shared libs), for GNU/Linux 2.6.15, stripped
In this example, the results of the pipeline became the argument list of the file command. There is an alternate syntax for command substitution in older shell programs which is also supported in bash. It uses back-quotes instead of the dollar sign and parentheses:
[me@linuxbox me]$ ls -l `which cp`
-rwxr-xr-x 1 root root 71516 2007-12-05 08:58 /bin/cp
Quoting
Now that we've seen how many ways the shell can perform expansions, it's time to learn how we can control it. Take for example:
[me@linuxbox me]$ echo this is a test
this is a test
or:
[me@linuxbox me]$ [me@linuxbox ~]$ echo The total is $100.00
The total is 00.00
In the first example, word-splitting by the shell removed extra whitespace from the echo command's list of arguments. In the second example, parameter expansion substituted an empty string for the value of “$1” because it was an undefined variable. The shell provides a mechanism called quoting to selectively suppress unwanted expansions.
Double Quotes
The first type of quoting we will look at is double quotes. If you place text inside double quotes, all the special characters used by the shell lose their special meaning and are treated as ordinary characters. The exceptions are “$”, “\” (backslash), and “`” (back- quote). This means that word-splitting, pathname expansion, tilde expansion, and brace expansion are suppressed, but parameter expansion, arithmetic expansion, and command substitution are still carried out. Using double quotes, we can cope with filenames containing embedded spaces. Say you were the unfortunate victim of a file called two words.txt. If you tried to use this on the command line, word-splitting would cause this to be treated as two separate arguments rather than the desired single argument:
[me@linuxbox me]$ ls -l two words.txt
ls: cannot access two: No such file or directory
ls: cannot access words.txt: No such file or directory
By using double quotes, you can stop the word-splitting and get the desired result; further, you can even repair the damage:
[me@linuxbox me]$ ls -l "two words.txt"
-rw-rw-r-- 1 me me 18 2008-02-20 13:03 two words.txt
[me@linuxbox me]$ mv "two words.txt" two_words.txt
There! Now we don't have to keep typing those pesky double quotes. Remember, parameter expansion, arithmetic expansion, and command substitution still take place within double quotes:
[me@linuxbox me]$ echo "$USER $((2+2)) $(cal)"
me 4
February 2008
Su Mo Tu We Th Fr Sa
1 2
3 4 5 6 7 8 9
10 11 12 13 14 15 16
17 18 19 20 21 22 23
24 25 26 27 28 29
We should take a moment to look at the effect of double quotes on command substitution. First let's look a little deeper at how word splitting works. In our earlier example, we saw how word-splitting appears to remove extra spaces in our text:
[me@linuxbox me]$ echo this is a test
this is a test
By default, word-splitting looks for the presence of spaces, tabs, and newlines (linefeed characters) and treats them as delimiters between words. This means that unquoted spaces, tabs, and newlines are not considered to be part of the text. They only serve as separators. Since they separate the words into different arguments, our example command line contains a command followed by four distinct arguments. If we add double quotes:
[me@linuxbox me]$ echo "this is a test"
this is a test
word-splitting is suppressed and the embedded spaces are not treated as delimiters, rather they become part of the argument. Once the double quotes are added, our command line contains a command followed by a single argument. The fact that newlines are considered delimiters by the word-splitting mechanism causes an interesting, albeit subtle, effect on command substitution. Consider the following:
[me@linuxbox me]$ echo $(cal)
February 2008
Su Mo Tu We Th Fr Sa
1 2
3 4 5 6 7 8 9
10 11 12 13 14 15 16
17 18 19 20 21 22 23
24 25 26 27 28 29
[me@linuxbox me]$ echo "$(cal)"
February 2008
Su Mo Tu We Th Fr Sa
1 2
3 4 5 6 7 8 9
10 11 12 13 14 15 16
17 18 19 20 21 22 23
24 25 26 27 28 29
In the first instance, the unquoted command substitution resulted in a command line containing thirty-eight arguments. In the second, a command line with one argument that includes the embedded spaces and newlines.
Single Quotes
If you need to suppress all expansions, you use single quotes. Here is a comparison of unquoted, double quotes, and single quotes:
[me@linuxbox me]$ echo text ~/*.txt {a,b} $(echo foo) $((2+2)) $USER
text /home/me/ls-output.txt a b foo 4 me
[me@linuxbox me]$ echo "text ~/*.txt {a,b} $(echo foo) $((2+2)) $USER"
text ~/*.txt {a,b} foo 4 me
[me@linuxbox me]$ echo 'text ~/*.txt {a,b} $(echo foo) $((2+2)) $USER'
text ~/*.txt {a,b} $(echo foo) $((2+2)) $USER
As you can see, with each succeeding level of quoting, more and more of the expansions are suppressed.
Escaping Characters
Sometimes you only want to quote a single character. To do this, you can precede a character with a backslash, which in this context is called the escape character. Often this is done inside double quotes to selectively prevent an expansion:
[me@linuxbox me]$ echo "The balance for user $USER is: \$5.00"
The balance for user me is: $5.00
It is also common to use escaping to eliminate the special meaning of a character in a filename. For example, it is possible to use characters in filenames that normally have special meaning to the shell. These would include “$”, “!”, “&”, “ “, and others. To include a special character in a filename you can to this:
[me@linuxbox me]$ mv bad\&filename good_filename
To allow a backslash character to appear, escape it by typing “\\”. Note that within single quotes, the backslash loses its special meaning and is treated as an ordinary character.
More Backslash Tricks
If you look at the man pages for any program written by the GNU project, you will notice that in addition to command line options consisting of a dash and a single letter, there are also long option names that begin with two dashes. For example, the following are equivalent:
Why do they support both? The short form is for lazy typists on the command line and the long form is mostly for scripts though some options may only be long form. I sometimes use obscure options, and I find the long form useful if I have to review a script again months after I wrote it. Seeing the long form helps me understand what the option does, saving me a trip to the man page. A little more typing now, a lot less work later. Laziness is maintained.
As you might suspect, using the long form options can make a single command line very long. To combat this problem, you can use a backslash to get the shell to ignore a newline character like this:
ls -l \
--reverse \
--human-readable \
--full-time
Using the backslash in this way allows us to embed newlines in our command. Note that for this trick to work, the newline must be typed immediately after the backslash. If you put a space after the backslash, the space will be ignored, not the newline. Backslashes are also used to insert special characters into our text. These are called backslash escape characters. Here are the common ones:
|
Escape Character
|
Name
|
Possible Uses
|
|
\n
|
newline
|
Adding blank lines to text
|
|
\t
|
tab
|
Inserting horizontal tabs to text
|
|
\a
|
alert
|
Makes your terminal beep
|
|
\\
|
backslash
|
Inserts a backslash
|
|
\f
|
formfeed
|
Sending this to your printer ejects the page
|
The use of the backslash escape characters is very common. This idea first appeared in the C programming language. Today, the shell, C++, perl, python, awk, tcl, and many other programming languages use this concept. Using the echo command with the -e option will allow us to demonstrate:
[me@linuxbox me]$ echo -e "Inserting several blank lines\n\n\n"
Inserting several blank lines
[me@linuxbox me]$ echo -e "Words\tseparated\tby\thorizontal\ttabs."
Words separated by horizontal tabs
[me@linuxbox me]$ echo -e "\aMy computer went \"beep\"." My computer went "beep". [me@linuxbox me]$ echo -e "DEL C:\\WIN2K\\LEGACY_OS.EXE" DEL C:\WIN2K\LEGACY_OS.EXE
Permissions
The Unix-like operating systems, such as Linux differ from other computing systems in that they are not only multitasking but also multi-user.
What exactly does this mean? It means that more than one user can be operating the computer at the same time. While your computer only has one keyboard and monitor, it can still be used by more than one user. For example, if your computer is attached to a network, or the Internet, remote users can log in via ssh (secure shell) and operate the computer. In fact, remote users can execute graphical applications and have the output displayed on a remote computer. The X Window system supports this.
The multi-user capability of Unix-like systems is a feature that is deeply ingrained into the design of the operating system. If you remember the environment in which Unix was created, this makes perfect sense. Years ago before computers were "personal," they were large, expensive, and centralized. A typical university computer system consisted of a large mainframe computer located in some building on campus and terminals were located throughout the campus, each connected to the large central computer. The computer would support many users at the same time.
In order to make this practical, a method had to be devised to protect the users from each other. After all, you could not allow the actions of one user to crash the computer, nor could you allow one user to interfere with the files belonging to another user.
This lesson will cover the following commands:
- chmod - modify file access rights
- su - temporarily become the superuser
- sudo - temporarily become the superuser
- chown - change file ownership
- chgrp - change a file's group ownership
File Permissions
On a Linux system, each file and directory is assigned access rights for the owner of the file, the members of a group of related users, and everybody else. Rights can be assigned to read a file, to write a file, and to execute a file (i.e., run the file as a program).
To see the permission settings for a file, we can use the ls command. As an example, we will look at the bash program which is located in the /bin directory:
[me@linuxbox me]$ ls -l /bin/bash
-rwxr-xr-x 1 root root 316848 Feb 27 2000 /bin/bash
Here we can see:
- The file "/bin/bash" is owned by user "root"
- The superuser has the right to read, write, and execute this file
- The file is owned by the group "root"
- Members of the group "root" can also read and execute this file
- Everybody else can read and execute this file
In the diagram below, we see how the first portion of the listing is interpreted. It consists of a character indicating the file type, followed by three sets of three characters that convey the reading, writing and execution permission for the owner, group, and everybody else.
chmod
The chmod command is used to change the permissions of a file or directory. To use it, you specify the desired permission settings and the file or files that you wish to modify. There are two ways to specify the permissions. In this lesson we will focus on one of these, called the octal notation method.
It is easy to think of the permission settings as a series of bits (which is how the computer thinks about them). Here's how it works:
rwx rwx rwx = 111 111 111
rw- rw- rw- = 110 110 110
rwx --- --- = 111 000 000
and so on...
rwx = 111 in binary = 7
rw- = 110 in binary = 6
r-x = 101 in binary = 5
r-- = 100 in binary = 4
Now, if you represent each of the three sets of permissions (owner, group, and other) as a single digit, you have a pretty convenient way of expressing the possible permissions settings. For example, if we wanted to set some_file to have read and write permission for the owner, but wanted to keep the file private from others, we would:
[me@linuxbox me]$ chmod 600 some_file
Here is a table of numbers that covers all the common settings. The ones beginning with "7" are used with programs (since they enable execution) and the rest are for other kinds of files.
| Value |
Meaning |
|
777
|
(rwxrwxrwx) No restrictions on permissions. Anybody may do anything. Generally not a desirable setting.
|
|
755
|
(rwxr-xr-x) The file's owner may read, write, and execute the file. All others may read and execute the file. This setting is common for programs that are used by all users.
|
|
700
|
(rwx------) The file's owner may read, write, and execute the file. Nobody else has any rights. This setting is useful for programs that only the owner may use and must be kept private from others.
|
|
666
|
(rw-rw-rw-) All users may read and write the file.
|
|
644
|
(rw-r--r--) The owner may read and write a file, while all others may only read the file. A common setting for data files that everybody may read, but only the owner may change.
|
|
600
|
(rw-------) The owner may read and write a file. All others have no rights. A common setting for data files that the owner wants to keep private.
|
Directory Permissions
The chmod command can also be used to control the access permissions for directories. Again, we can use the octal notation to set permissions, but the meaning of the r, w, and x attributes is different:
- r - Allows the contents of the directory to be listed if the x attribute is also set.
- w - Allows files within the directory to be created, deleted, or renamed if the x attribute is also set.
- x - Allows a directory to be entered (i.e. cd dir).
Here are some useful settings for directories:
| Value |
Meaning |
|
777
|
(rwxrwxrwx) No restrictions on permissions. Anybody may list files, create new files in the directory and delete files in the directory. Generally not a good setting.
|
|
755
|
(rwxr-xr-x) The directory owner has full access. All others may list the directory, but cannot create files nor delete them. This setting is common for directories that you wish to share with other users.
|
|
700
|
(rwx------) The directory owner has full access. Nobody else has any rights. This setting is useful for directories that only the owner may use and must be kept private from others.
|
Becoming The Superuser For A Short While
It is often necessary to become the superuser to perform important system administration tasks, but as you have been warned, you should not stay logged in as the superuser. In most distributions, there is a program that can give you temporary access to the superuser's privileges. This program is called su (short for substitute user) and can be used in those cases when you need to be the superuser for a small number of tasks. To become the superuser, simply type the su command. You will be prompted for the superuser's password:
[me@linuxbox me]$ su
Password:
[root@linuxbox me]#
After executing the su command, you have a new shell session as the superuser. To exit the superuser session, type exit and you will return to your previous session.
In some distributions, most notably Ubuntu, an alternate method is used. Rather than using su, these systems employ the sudo command instead. With sudo, one or more users are granted superuser privileges on an as needed basis. To execute a command as the superuser, the desired command is simply preceeded with the sudo command. After the command is entered, the user is prompted for the user's password rather than the superuser's:
[me@linuxbox me]$ sudo some_command
Password:
[me@linuxbox me]$
Changing File Ownership
You can change the owner of a file by using the chown command. Here's an example: Suppose I wanted to change the owner of some_file from "me" to "you". I could:
[me@linuxbox me]$ su
Password:
[root@linuxbox me]# chown you some_file
[root@linuxbox me]# exit
[me@linuxbox me]$
Notice that in order to change the owner of a file, you must be the superuser. To do this, our example employed the su command, then we executed chown, and finally we typed exit to return to our previous session.
chown works the same way on directories as it does on files.
Changing Group Ownership
The group ownership of a file or directory may be changed with chgrp. This command is used like this:
[me@linuxbox me]$ chgrp new_group some_file
In the example above, we changed the group ownership of some_file from its previous group to "new_group". You must be the owner of the file or directory to perform a chgrp.
Job Control
In the previous lesson, we looked at some of the implications of Linux being a multi-user operating system. In this lesson, we will examine the multitasking nature of Linux, and how this is manipulated with the command line interface.
As with any multitasking operating system, Linux executes multiple, simultaneous processes. Well, they appear simultaneous, anyway. Actually, a single processor computer can only execute one process at a time but the Linux kernel manages to give each process its turn at the processor and each appears to be running at the same time.
There are several commands that can be used to control processes. They are:
- ps - list the processes running on the system
- kill - send a signal to one or more processes (usually to "kill" a process)
- jobs - an alternate way of listing your own processes
- bg - put a process in the background
- fg - put a process in the forground
A Practical Example
While it may seem that this subject is rather obscure, it can be very practical for the average user who mostly works with the graphical user interface. You might not know this, but most (if not all) of the graphical programs can be launched from the command line. Here's an example: there is a small program supplied with the X Window system called xload which displays a graph representing system load. You can excute this program by typing the following:
Notice that the small xload window appears and begins to display the system load graph. Notice also that your prompt did not reappear after the program launched. The shell is waiting for the program to finish before control returns to you. If you close the xload window, the xload program terminates and the prompt returns.
Putting A Program In The Background
Now, in order to make life a little easier, we are going to launch the xload program again, but this time we will put it in the background so that the prompt will return. To do this, we execute xload like this:
[me@linuxbox me]$ xload &
[1] 1223
[me@linuxbox me]$
In this case, the prompt returned because the process was put in the background.
Now imagine that you forgot to use the "&" symbol to put the program into the background. There is still hope. You can type Ctrl-z and the process will be suspended. The process still exists, but is idle. To resume the process in the background, type the bg command (short for background). Here is an example:
[me@linuxbox me]$ xload
[2]+ Stopped xload
[me@linuxbox me]$ bg
[2]+ xload &
Listing Your Processes
Now that we have a process in the background, it would be helpful to display a list of the processes we have launched. To do this, we can use either the jobs command or the more powerful ps command.
[me@linuxbox me]$ jobs
[1]+ Running xload &
[me@linuxbox me]$ ps
PID TTY TIME CMD
1211 pts/4 00:00:00 bash
1246 pts/4 00:00:00 xload
1247 pts/4 00:00:00 ps
[me@linuxbox me]$
Killing A Process
Suppose that you have a program that becomes unresponsive; how do you get rid of it? You use the kill command, of course. Let's try this out on xload. First, you need to identify the process you want to kill. You can use either jobs or ps, to do this. If you use jobs you will get back a job number. With ps, you are given a process id (PID). We will do it both ways:
[me@linuxbox me]$ xload &
[1] 1292
[me@linuxbox me]$ jobs
[1]+ Running xload &
[me@linuxbox me]$ kill %1
[me@linuxbox me]$ xload &
[2] 1293
[1] Terminated xload
[me@linuxbox me]$ ps
PID TTY TIME CMD
1280 pts/5 00:00:00 bash
1293 pts/5 00:00:00 xload
1294 pts/5 00:00:00 ps
[me@linuxbox me]$ kill 1293
[2]+ Terminated xload
[me@linuxbox me]$
A Little More About kill
While the kill command is used to "kill" processes, its real purpose is to send signals to processes. Most of the time the signal is intended to tell the process to go away, but there is more to it than that. Programs (if they are properly written) listen for signals from the operating system and respond to them, most often to allow some graceful method of terminating. For example, a text editor might listen for any signal that indicates that the user is logging off, or that the computer is shutting down. When it receives this signal, it saves the work in progress before it exits. The kill command can send a variety of signals to processes. Typing:
kill -l
will give you a list of the signals it supports. Most are rather obscure, but several are useful to know:
|
Signal #
|
Name
|
Description
|
| 1 |
SIGHUP |
Hang up signal. Programs can listen for this signal and act upon it. This signal is sent to processes running in a terminal when you close the terminal.
|
| 2 |
SIGINT |
Interrupt signal. This signal is given to processes to interrupt them. Programs can process this signal and act upon it. You can also issue this signal directly by typing Ctrl-c in the terminal window where the program is running.
|
| 15 |
SIGTERM |
Termination signal. This signal is given to processes to terminate them. Again, programs can process this signal and act upon it. This is the default signal sent by the kill command if no signal is specified.
|
| 9 |
SIGKILL |
Kill signal. This signal causes the immediate termination of the process by the Linux kernel. Programs cannot listen for this signal.
|
Now let's suppose that you have a program that is hopelessly hung and you want to get rid of it. Here's what you do:
- Use the ps command to get the process id (PID) of the process you want to terminate.
- Issue a kill command for that PID.
- If the process refuses to terminate (i.e., it is ignoring the signal), send increasingly harsh signals until it does terminate.
[me@linuxbox me]$ ps x | grep bad_program
PID TTY STAT TIME COMMAND
2931 pts/5 SN 0:00 bad_program
[me@linuxbox me]$ kill -SIGTERM 2931
[me@linuxbox me]$ kill -SIGKILL 2931
In the example above I used the ps command with the x option to list all of my processes (even those not launched from the current terminal). In addition, I piped the output of the ps command into grep to list only list the program I was interested in. Next, I used kill to issue a SIGTERM signal to the troublesome program. In actual practice, it is more common to do it in the following way since the default signal sent by kill is SIGTERM and kill can also use the signal number instead of the signal name:
[me@linuxbox me]$ kill 2931
Then, if the process does not terminate, force it with the SIGKILL signal:
[me@linuxbox me]$ kill -9 2931
That's It!
This concludes the "Learning the shell" series of lessons. In the next series, "Writing shell scripts," we will look at how to automate tasks with the shell.